WhenDid.io allows an unlimited number of action buttons to be created. When you add a button, you can set how that button appears and how it behaves. To add a new action button:
-
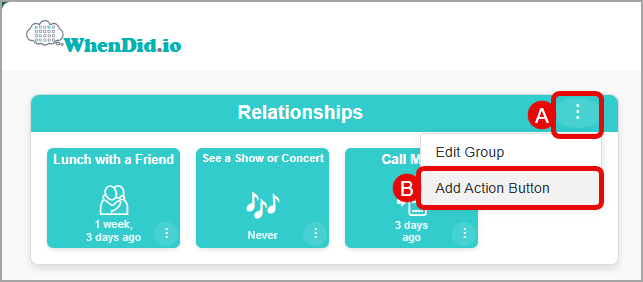
Open the Group Menu (the three-dot icon in the top-right corner of any group).
-
Select Add Action Button from the dropdown.
-
A new button will appear in the group with a default name like "Button 2" and the Edit Action Button task pane will open.
-
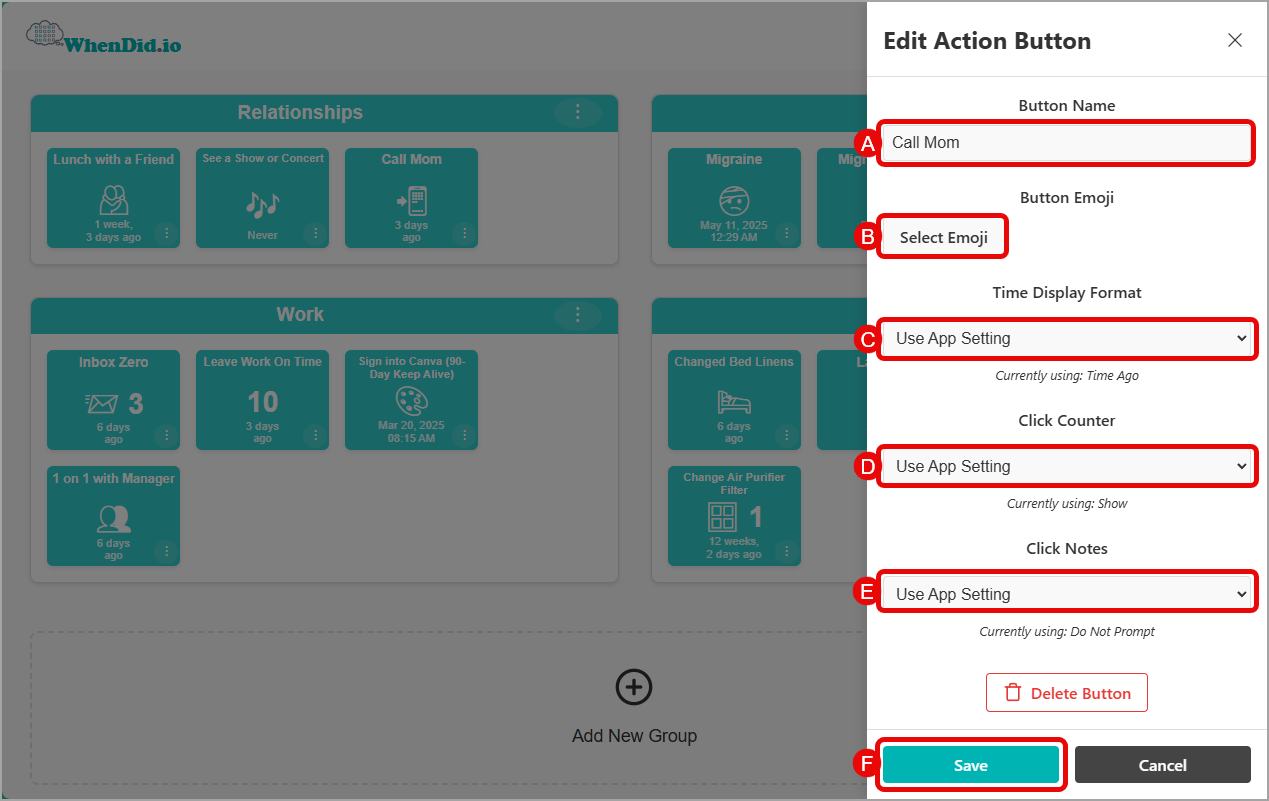
In the task pane, you can:
a. Change the button's Name: Short button names work best. Longer names will appear in a smaller font to fit the title area of the action button.
b. Select emoji: Most popular emoji are available. You can enter a word in the Search box to quickly find an emoji, or navigate using the categories at the top to scroll through all available emoji. It is not necessary for a button to have an emoji, but it can make it easier to quickly identify a button when you need to click one. Note that some systems (such as Windows 11) likes to override many of the emoji icons with its own style of emoji. We are currently working on a fix for this.
c: Set the Time Display Format:
- Use App Setting: This is the default setting for all new buttons. Unless changed, all buttons will use the Time Display Format selected in Settings > Button Appearance > Time Display Format. When Use App Setting is selected, a note will appear below the dropdown indicating what that setting is currently.
- Date / Time: Displays the most recent date and time that a button was clicked. (Example: Mar 20, 2025 08:25 AM)
- Time Ago: Displays how long ago the button was last clicked in a friendly format. (Example: 10 hours, 12 minutes ago)
d. Show or Hide the Click Counter:
- Use App Setting: This is the default setting for all new buttons. Unless changed, all buttons will use the Click Counter option selected in Settings > Button Appearance > Click Counter. When Use App Setting is selected, a note will appear below the dropdown indicating what that setting is currently.
- Show: Displays the number of times this button has been clicked.
- Hide: Do not display the number of times this button has been clicked.
e. Enable or Disable Click Notes: (Note: You must be signed in to access this feature.)
- Use App Setting: This is the default setting for all new buttons. Unless changed, all buttons will use the Click Notes option selected in Settings > Button Behavior > Click Notes. When Use App Setting is selected, a note will appear below the dropdown indicating what that setting is currently.
- Prompt Me: When the action button has been clicked, a text box will appear in the task pane where you can enter a message (up to 140-characters) with information related to the click. The time that is recorded is the time that you save the note, not the time you clicked the button. If you click Cancel, the initial click will not be recorded.
- Do Not Prompt: When the action button has been clicked, the click will be recorded without prompting for notes to be added.
f. Click the Save button or press the Enter key on your keyboard to save your changes.
- Use App Setting: This is the default setting for all new buttons. Unless changed, all buttons will use the Time Display Format selected in Settings > Button Appearance > Time Display Format. When Use App Setting is selected, a note will appear below the dropdown indicating what that setting is currently.
You can now click this new button to begin tracking events, or edit it to customize the name, emoji, and display settings.